本文共 4426 字,大约阅读时间需要 14 分钟。
一、简 介
PostgreSQL 是一种非常复杂的对象-关系型数据库管理系统(ORDBMS),也是目前功能最强大,特性最丰富和最复杂的自由软件数据库系统。有些特性甚至连商业数据库都不具备。这个起源于伯克利(BSD)的数据库研究计划目前已经衍生成一项国际开发项目,并且有非常广泛的用户。
优势:http://www.cnblogs.com/zhangpengme/archive/2011/12/01/2271092.html
官网:http://www.postgresql.org/ (官网有各种包和说明,很详细)
二、三种安装过程
A. RPM包安装
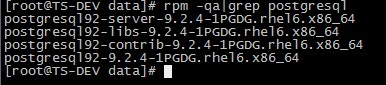
1.检查PostgreSQL 是否已经安装
rpm -qa|grep postgres
若已经安装,则使用rpm -e 命令卸载。
2.下载RPM包
#wget http://yum.postgresql.org/9.2/redhat/rhel-6-i386/postgresql92-contrib-9.2.4-1PGDG.rhel6.i686.rpm
#wget http://yum.postgresql.org/9.2/redhat/rhel-6-i386/postgresql92-libs-9.2.4-1PGDG.rhel6.i686.rpm
#wget https://download.postgresql.org/pub/repos/yum/9.6/redhat/rhel-7-x86_64/pgdg-centos96-9.6-3.noarch.rpm
3. 安装PostgreSQL,注意安装顺序
# rpm -ivh postgresql92-libs-9.2.4-1PGDG.rhel6.i686.rpm
# rpm -ivh postgresql92-9.2.4-1PGDG.rhel6.i686.rpm
# rpm -ivh postgresql92-server-9.2.4-1PGDG.rhel6.i686.rpm
# rpm -ivh postgresql92-contrib-9.2.4-1PGDG.rhel6.i686.rpm
4. 初始化PostgreSQL库
PostgreSQL 服务初次启动的时候会提示初始化。

# service postgresql-9.2 initdb

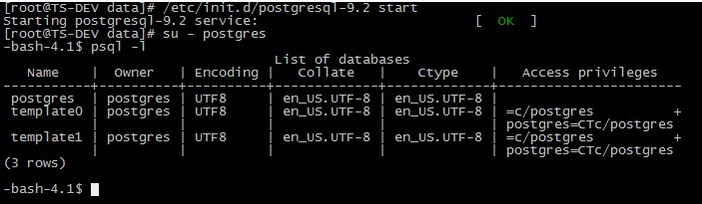
5. 启动服务
# service postgresql-9.2 start

6. 把PostgreSQL 服务加入到启动列表
# chkconfig postgresql-9.2on
# chkconfig --list|grep postgres
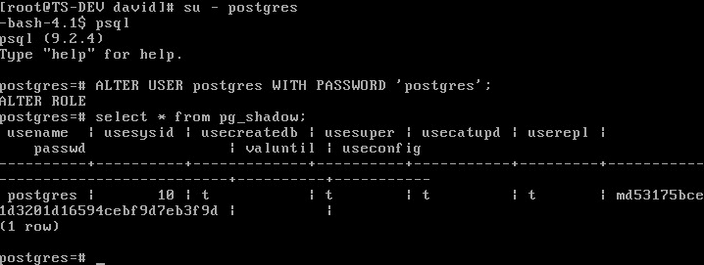
7. 修改PostgreSQL数据库用户postgres的密码(注意不是linux系统帐号)
PostgreSQL数据库默认会创建一个postgres的数据库用户作为数据库的管理员,默认密码为空,我们需要修改为指定的密码,这里设定为’postgres’。
# su - postgres
$ psql
# ALTERUSER postgres WITH PASSWORD 'postgres';
# select * from pg_shadow ;
B. yum 安装
1. 将刚才安装的PostgreSQL 卸载
# /etc/init.d/postgresql-9.2 stop //停止PostgreSQL服务
//查看已安装的包
# rpm -qa|grep postgres
//卸载
# rpm -e postgresql92-server-9.2.4-1PGDG.rhel6.i686
# rpm -e postgresql92-contrib-9.2.4-1PGDG.rhel6.i686
# rpm -e postgresql92-9.2.4-1PGDG.rhel6.i686
# rpm -e postgresql92-libs-9.2.4-1PGDG.rhel6.i686
2. yum 安装
如果是默认yum 安装的话,会安装较低版本的PostgreSQL 8.4,这不符合我们的要求。
我们使用PostgreSQL Yum Repository 来安装最新版本的PostgreSQL。
2.1 安装PostgreSQL yum repository
# rpm -i http://yum.postgresql.org/9.2/RedHat/rhel-6-x86_64/pgdg-redhat92-9.2-7.noarch.rpm
2.2 安装新版本PostgreSQL
# yum install postgresql92-server postgresql92-contrib
2.3 查看安装
3. 初始化并启动数据库

配置文件:/var/lib/pgsql/data/pg_hba.conf
4. 测试
其他步骤如A方式。
C. 源码包安装
1、下载Postgresql源代码
wget http://ftp.postgresql.org/pub/source/v9.0.3/postgresql-9.0.3.tar.bz2
wget https://ftp.postgresql.org/pub/source/v9.6.2/postgresql-9.6.2.tar.bz2
2、解压该文件
tar xjvf postgresql-9.0.3.tar.bz2
3、进入解压后的目录
cd postgresql-9.0.3/
4、查看INSTALL
INSTALL文件中Short Version部分解释了如何安装postgresql的命令,Requirements部分描述了安装postgresql所依赖的lib,比较长,先 configure试一下,如果出现error,那么需要检查是否满足了Requirements的要求。
Short Version
./configure
gmake
su
gmake install
adduser postgres
mkdir /usr/local/pgsql/data
chown postgres /usr/local/pgsql/data
su - postgres
/usr/local/pgsql/bin/initdb -D /usr/local/pgsql/data
/usr/local/pgsql/bin/postgres -D /usr/local/pgsql/data >logfile 2>&1 &
/usr/local/pgsql/bin/createdb test
/usr/local/pgsql/bin/psql test
5、执行INSTALL文件中Short Version的命令,开始编译安装postgrepsql数据库。
./configure --prefix=/usr/local/pgsql --with-perl --with-python --with-libxml --with-libxslt
configure: error: readline library not found
If you have readline already installed, see config.log for details on the
failure. It is possible the compiler isnt looking in the proper directory.
yum install -y readline-devel
(sudo apt-get install libreadline5-dev && sudo apt-get install zlib1g-dev)
configure: error: library 'xslt' is required for XSLT support
yum install libxslt libxslt-devel
configure: error: header file <Python.h> is required for Python
yum install python python-devel
configure: error: could not determine flags for linking embedded Perl.
yum install perl-ExtUtils-Embed
安装readline包之后,重新configure,成功。
6、make
7、make install
8、添加用户postgres
useradd postgres
9、创建数据库文件存储文件夹
mkdir /usr/local/pgsql/data
#mkdir /data/pgsql
10、改变先前创建的data目录的文件夹的权限
chown postgres /usr/local/pgsql/data
#chown postgres /data/pgsql
11、切换用户
su - postgres
12、绑定数据库文件存储目录
/usr/local/pgsql/bin/initdb -D /usr/local/pgsql/data
#export PATH=$PATH:/usr/local/pgsql/bin/
#/usr/local/pgsql/bin/initdb -D /data/pgsql
13、启动数据库
/usr/local/pgsql/bin/postgres -D /usr/local/pgsql/data >logfile 2>&1
[1] 18635
#/usr/local/pgsql/bin/postgres -D /data/pgsql >logfile 2>&1
[1] 18635
14、创建数据库test
/usr/local/pgsql/bin/createdb test
15、连接到test数据库
/usr/local/pgsql/bin/psql test
psql (9.0.3)
Type "help" for help.
test=#
16、创建表table1
test=# create table table1 (
test(# id integer
test(# );
CREATE TABLE
test=#
17、向table1表中插入一条记录
test=# insert into table1 values(1);
INSERT 0 1
18、查询刚刚插入的记录
test=# select * from table1;
id